Effortless navigation with rich menu options
Visual product choices boost sales fast
Personalized content adapts in real-time
Seamless scrolling for better UX flow
Instant content duplication saves time
Quick access to powerful design elements
Ready-made templates speed up design
Advanced custom fields for flexible data
Clone sites easily without hassle
Crisp, scalable graphics for all screens
Rebrand tools for a professional look
Show or hide content with precision
Engaging depth with smooth motion
Add clear notes and annotations easily
Helpful hints improve user interaction
Animate elements with stylish flair
Keep important sections always visible
Full control with custom code tweaks
Optimize files to boost site speed
Crafted page templates to help you get started with your landing page just by dropping a starter design
Ready Blocks comes with a variety of layouts and design elements, such as headers, footers, and widgets etc.
Pre-designed headers with lucrative styles that are suitable for various niche websites and design tastes
A helpful collection of footer designs to help you create an instant attractive footer on your landing page
Find us 24/7 at your service. We are glad to help.
Detailed guidelines available for every features at BdThemes
Learn something new, stay informed about WordPress, Web Design and more
Here are some of the key milestones in my development:
Learn product usage, WordPress tips & tricks from our videos
Earn hefty commissions by joining us in the promotion
Widget Idea Share is a great way to find similar widgets that you can improve.
Certainly! If you need to get in touch with us feel free to reach out
Build any WordPress form in minutes with Sigma Forms.
Coming Soon & Maintenance Mode Page Builder Plugin
Easily make websites accessible with One Accessibility
Display client testimonials to enhance trust and credibility.
Zoloblocks helps craft stunning Gutenberg-based websites.
Most superior Slider in the Era of Elementor Slider
The only Compatible blogging widgets in Elementor for any Blog
Build a next-gen WordPress eCommerce website for business
Organize your photos in a different angel every time with Elementor
Boost engagement and increase sales using Spin Wheel.
Powerful AI Image Generator Plugin for WordPress by ChatGPT
Get 360° Augmented Reality for WooCommerce today!
Copy & Paste any web design you like just with 2 clicks!
A fully functioning theme for elementor with unlimited options
Smart, Clean & Flexible Block Theme for Gutenberg
Dark Reader plugin ensures eye-friendly web reading.
WooCommerce one-page checkout to boost conversions.
Access 100+ premium WordPress plugins with lifetime updates and dedicated support.
Effortless navigation with rich menu options
Visual product choices boost sales fast
Personalized content adapts in real-time
Seamless scrolling for better UX flow
Instant content duplication saves time
Quick access to powerful design elements
Ready-made templates speed up design
Advanced custom fields for flexible data
Clone sites easily without hassle
Crisp, scalable graphics for all screens
Rebrand tools for a professional look
Show or hide content with precision
Engaging depth with smooth motion
Add clear notes and annotations easily
Helpful hints improve user interaction
Animate elements with stylish flair
Keep important sections always visible
Full control with custom code tweaks
Optimize files to boost site speed
Crafted page templates to help you get started with your landing page just by dropping a starter design
Ready Blocks comes with a variety of layouts and design elements, such as headers, footers, and widgets etc.
Pre-designed headers with lucrative styles that are suitable for various niche websites and design tastes
A helpful collection of footer designs to help you create an instant attractive footer on your landing page
Find us 24/7 at your service. We are glad to help.
Detailed guidelines available for every features at BdThemes
Learn something new, stay informed about WordPress, Web Design and more
Here are some of the key milestones in my development:
Learn product usage, WordPress tips & tricks from our videos
Earn hefty commissions by joining us in the promotion
Widget Idea Share is a great way to find similar widgets that you can improve.
Certainly! If you need to get in touch with us feel free to reach out
Build any WordPress form in minutes with Sigma Forms.
Coming Soon & Maintenance Mode Page Builder Plugin
Easily make websites accessible with One Accessibility
Display client testimonials to enhance trust and credibility.
Zoloblocks helps craft stunning Gutenberg-based websites.
Most superior Slider in the Era of Elementor Slider
The only Compatible blogging widgets in Elementor for any Blog
Build a next-gen WordPress eCommerce website for business
Organize your photos in a different angel every time with Elementor
Boost engagement and increase sales using Spin Wheel.
Powerful AI Image Generator Plugin for WordPress by ChatGPT
Get 360° Augmented Reality for WooCommerce today!
Copy & Paste any web design you like just with 2 clicks!
A fully functioning theme for elementor with unlimited options
Smart, Clean & Flexible Block Theme for Gutenberg
Dark Reader plugin ensures eye-friendly web reading.
WooCommerce one-page checkout to boost conversions.

Access 100+ premium WordPress plugins with lifetime updates and dedicated support.
Tired of the WordPress Gallery widget! Element Pack brings the Advanced Image Gallery widget. With this new widget, you will have full control over the gallery layout and design. It includes all-new amazing & necessary features for you. That is why it’s the best choice to make your photo gallery website.
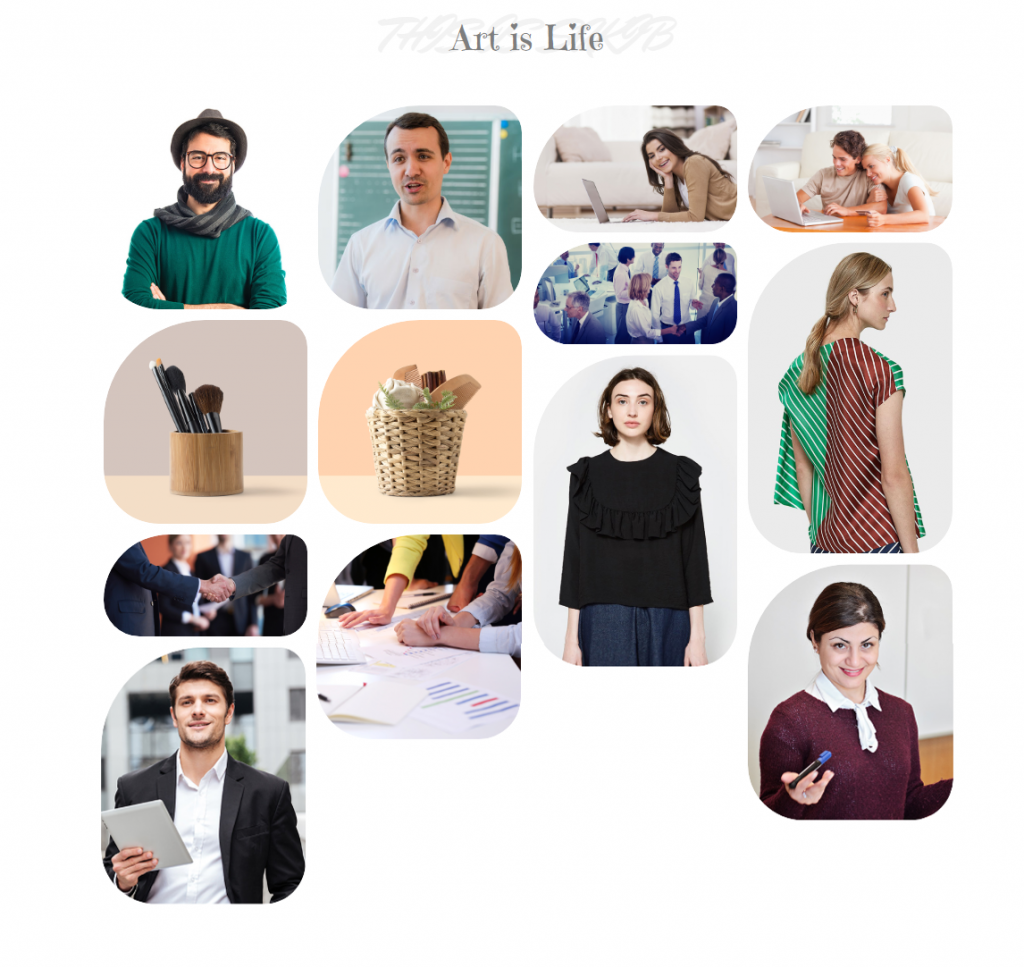
An image speaks for itself. No one can describe an image with a few words. But an Image gallery, it is a whole different level. Once again, Element Pack brings you an outstanding widget to showcase your valuable images.
Presenting the Advanced Image Gallery widget for Elementor.
Sit tight! I’m about to unpack a lot of cool features of this widget.
Element Pack is the most optimized add-on based on the WordPress Elementor plugin for creating your premium photo gallery website.
This plugin has a vast inventory ready to be deployed on your website. Also With 140+ plugins, 400+ ready-to-use pages, over 1100 unique blocks, Element Pack has made it to the position of Top 6 worldwide.
Element Pack is a visionary company. We work non-stop to create things out of ideas. Because we are creative, we always make our consumers happy. In fact, we wanted to make sure our widget will live a mark in the highest performance. Our engineers worked very hard to make each hand-crafted widget. The result: a stunning widget with more stability and a lightweight frame.
You can use our widget to create your photo gallery website with ease. Moreover, it supports all platforms and plugins. Also, you can use it with any theme you like.
Alright, enough chitchat. Let’s see it in action.

Although it’s no worth mentioning, still let’s be clear. Drag and drop the widget from the widget menu into a section.
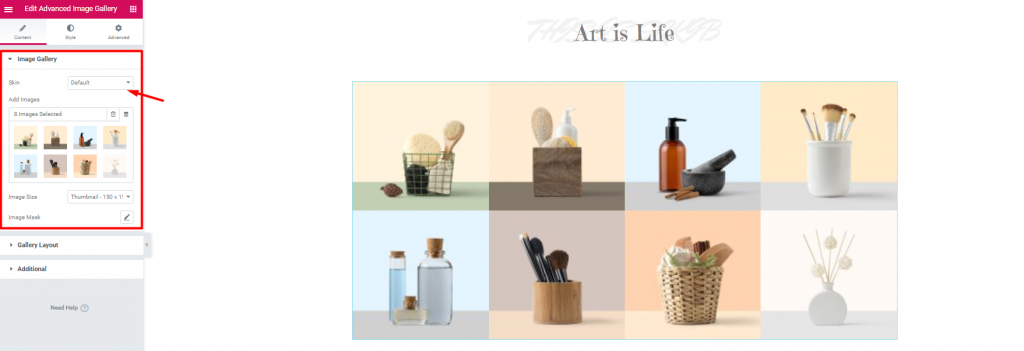
First things first. The first section you will see is the Image Gallery. Here, you have to pick the images that you want to show. Also, you will have a drop-down option ‘SKIN‘. From there, you can select the showcase style for the photo gallery website.

Take the image above as an example. You can change the gallery style to Carousel from the Skin option.
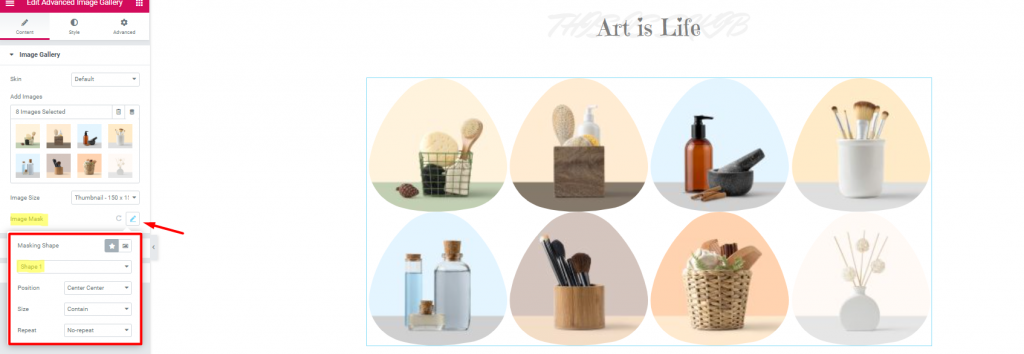
Hold your horses! This is an outstanding setting that you will not find anywhere else. The Image Mask option lets you choose from 20 variety of masking style. Hence, with this feature, you can add more spice to your photo gallery website.
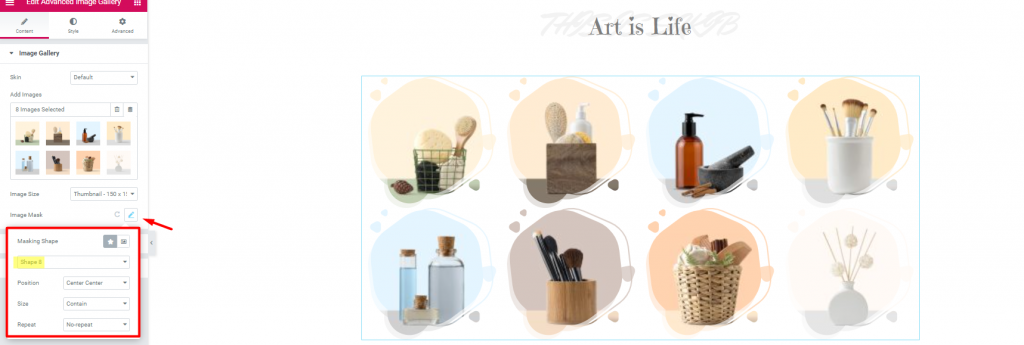
Although, you can figure it out. Let me give you another example of the Image mask option.
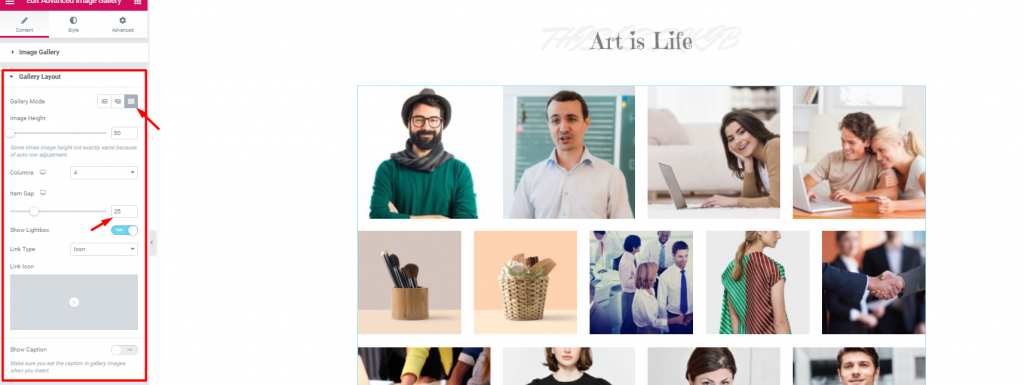
Well, to be frank, this advanced image gallery supports 3 different image alignment styles. Moreover, you can choose them from the Gallery Mode option. The image above is showing ‘Justified’ mode. In fact, this mode groups up images with similar height.


However, from the Link Type option, you can either choose an icon or text for the link button.
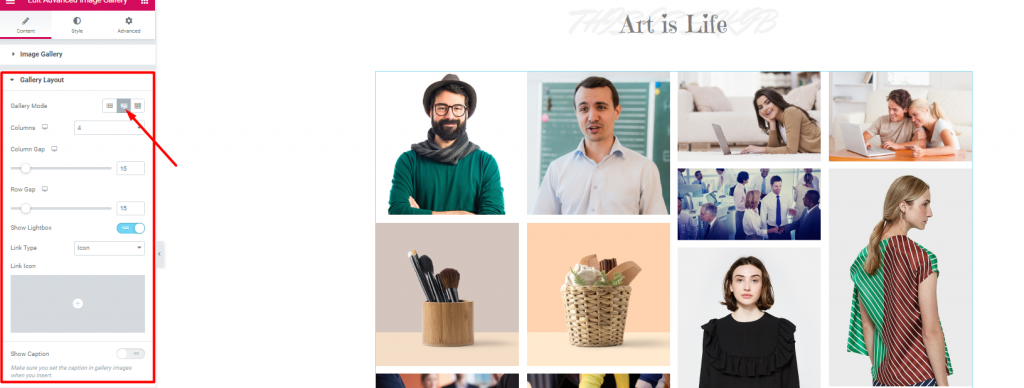
Once again, the ‘Masonry’ mode groups up images with similar width. Isn’t this feature so cool? Note that, the Gallery Mode is set to normal as default.

Additionally, you have an option to add a tilt effect. Also, you can choose lightbox animation from here. Note that, lightbox will appear when you click on the link button.
Time for the fun part. Till now, all we have done is basic settings. Now, we will change the appearance of the advanced image galley. Let’s get going
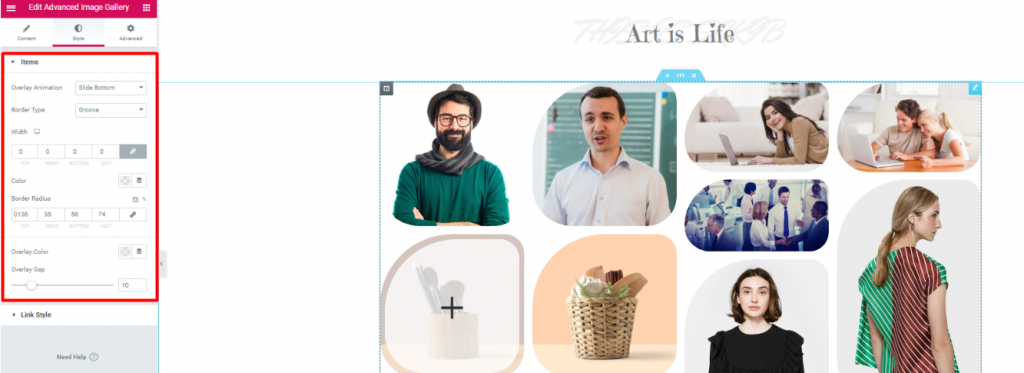
Border option is not a new thing. With the Advanced Image Gallery widget, you have a brilliant border option in hand. As you can see, the first option is Overlay Animation. What is does is cover up the image with another layer of coat.
One thing I can’t help but say, the overlay option has many uses. You can set any thin layer of color as an overlay and display it over each image. Not only it brings a unique effect but also it brings attention. However, explore this customizable section carefully to learn more about it.
Ops! I forgot to mention. I’ve made that unique image shape using the Border Radius option. Hence, try it out yourself and create a unique photo gallery website.
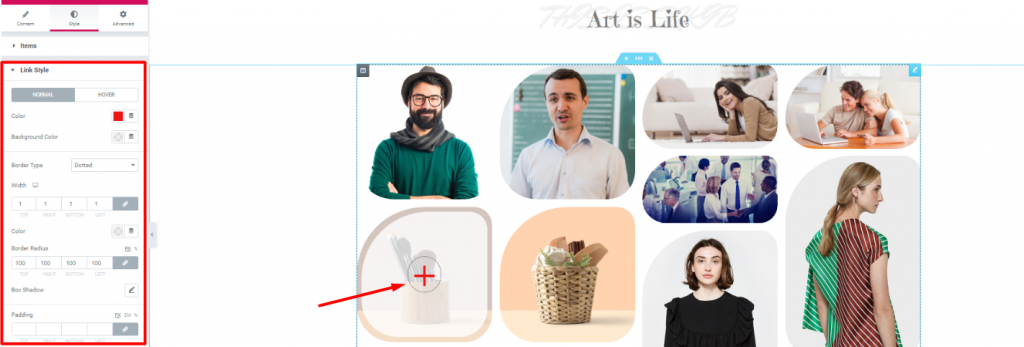
Last but not least, the Link Style section lets you change the color and border of the link button. Clicking this button will zoom the image. Also, you can add padding and a box-shadow to it.
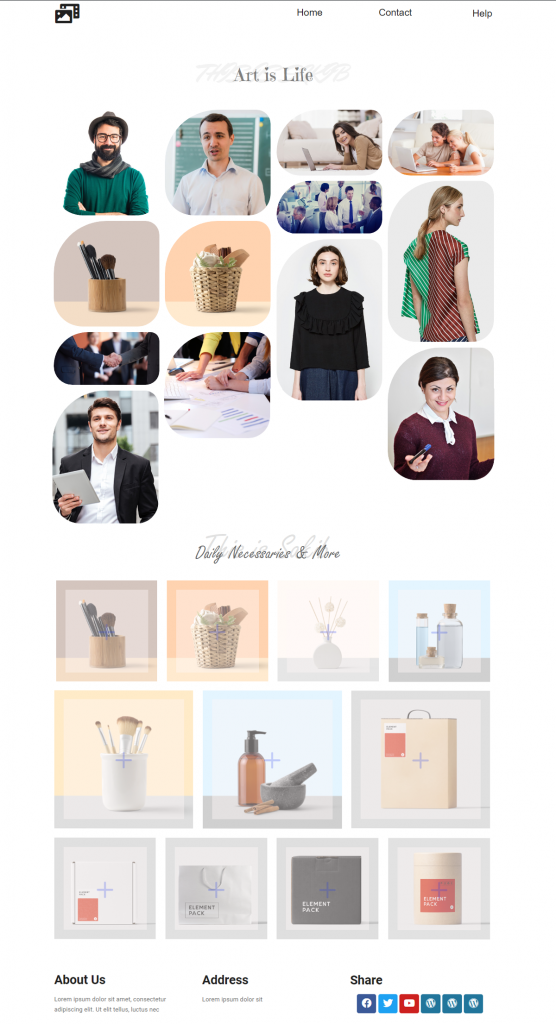
Congratulations! Now that you have made this far, it seems you have learned the whole process. As you saw, you can create your beautiful photo gallery website with this Advanced Image Gallery widget easily.
So do not waste more time, let’s make some epic websites! Once again, thanks for reading this blog.
We are running a give-away program to our beloved consumers & subscribers who are connected to our official website BDthemes.com
Visit Element Pack or Prime Slider and share with us your thoughts. Lucky winners will receive a lifetime license worth $100. It will only take a minute to take part in.
Largest Elementor Templates pack with the most user-friendly UI and 300+ useful Elementor widgets. Build websites from zero to 100% perfection in no time.
This website is powered by Element Pack Pro and Rooten Theme.
Copyright © 2025 BdThemes. All Rights Reserved.