Effortless navigation with rich menu options
Visual product choices boost sales fast
Personalized content adapts in real-time
Seamless scrolling for better UX flow
Instant content duplication saves time
Quick access to powerful design elements
Ready-made templates speed up design
Advanced custom fields for flexible data
Clone sites easily without hassle
Crisp, scalable graphics for all screens
Rebrand tools for a professional look
Show or hide content with precision
Engaging depth with smooth motion
Add clear notes and annotations easily
Helpful hints improve user interaction
Animate elements with stylish flair
Keep important sections always visible
Full control with custom code tweaks
Optimize files to boost site speed
Crafted page templates to help you get started with your landing page just by dropping a starter design
Ready Blocks comes with a variety of layouts and design elements, such as headers, footers, and widgets etc.
Pre-designed headers with lucrative styles that are suitable for various niche websites and design tastes
A helpful collection of footer designs to help you create an instant attractive footer on your landing page
Find us 24/7 at your service. We are glad to help.
Detailed guidelines available for every features at BdThemes
Learn something new, stay informed about WordPress, Web Design and more
Here are some of the key milestones in my development:
Learn product usage, WordPress tips & tricks from our videos
Earn hefty commissions by joining us in the promotion
Widget Idea Share is a great way to find similar widgets that you can improve.
Certainly! If you need to get in touch with us feel free to reach out
Build any WordPress form in minutes with Sigma Forms.
Coming Soon & Maintenance Mode Page Builder Plugin
Easily make websites accessible with One Accessibility
Display client testimonials to enhance trust and credibility.
Zoloblocks helps craft stunning Gutenberg-based websites.
Most superior Slider in the Era of Elementor Slider
The only Compatible blogging widgets in Elementor for any Blog
Build a next-gen WordPress eCommerce website for business
Organize your photos in a different angel every time with Elementor
Boost engagement and increase sales using Spin Wheel.
Powerful AI Image Generator Plugin for WordPress by ChatGPT
Get 360° Augmented Reality for WooCommerce today!
Copy & Paste any web design you like just with 2 clicks!
A fully functioning theme for elementor with unlimited options
Smart, Clean & Flexible Block Theme for Gutenberg
Dark Reader plugin ensures eye-friendly web reading.
WooCommerce one-page checkout to boost conversions.
Access 100+ premium WordPress plugins with lifetime updates and dedicated support.
Effortless navigation with rich menu options
Visual product choices boost sales fast
Personalized content adapts in real-time
Seamless scrolling for better UX flow
Instant content duplication saves time
Quick access to powerful design elements
Ready-made templates speed up design
Advanced custom fields for flexible data
Clone sites easily without hassle
Crisp, scalable graphics for all screens
Rebrand tools for a professional look
Show or hide content with precision
Engaging depth with smooth motion
Add clear notes and annotations easily
Helpful hints improve user interaction
Animate elements with stylish flair
Keep important sections always visible
Full control with custom code tweaks
Optimize files to boost site speed
Crafted page templates to help you get started with your landing page just by dropping a starter design
Ready Blocks comes with a variety of layouts and design elements, such as headers, footers, and widgets etc.
Pre-designed headers with lucrative styles that are suitable for various niche websites and design tastes
A helpful collection of footer designs to help you create an instant attractive footer on your landing page
Find us 24/7 at your service. We are glad to help.
Detailed guidelines available for every features at BdThemes
Learn something new, stay informed about WordPress, Web Design and more
Here are some of the key milestones in my development:
Learn product usage, WordPress tips & tricks from our videos
Earn hefty commissions by joining us in the promotion
Widget Idea Share is a great way to find similar widgets that you can improve.
Certainly! If you need to get in touch with us feel free to reach out
Build any WordPress form in minutes with Sigma Forms.
Coming Soon & Maintenance Mode Page Builder Plugin
Easily make websites accessible with One Accessibility
Display client testimonials to enhance trust and credibility.
Zoloblocks helps craft stunning Gutenberg-based websites.
Most superior Slider in the Era of Elementor Slider
The only Compatible blogging widgets in Elementor for any Blog
Build a next-gen WordPress eCommerce website for business
Organize your photos in a different angel every time with Elementor
Boost engagement and increase sales using Spin Wheel.
Powerful AI Image Generator Plugin for WordPress by ChatGPT
Get 360° Augmented Reality for WooCommerce today!
Copy & Paste any web design you like just with 2 clicks!
A fully functioning theme for elementor with unlimited options
Smart, Clean & Flexible Block Theme for Gutenberg
Dark Reader plugin ensures eye-friendly web reading.
WooCommerce one-page checkout to boost conversions.

Access 100+ premium WordPress plugins with lifetime updates and dedicated support.
If you have an online store and having trouble with customer checkout, we are here to help you create checkout page using Elementor Pro.
As the Ecommerce industry is growing rapidly and searching customer care as well as attention span is also decreasing, Ecommerce website owners are trying to make their websites more user-friendly and appealing. In this blog, I am trying to guide you on how to create checkout page using Elementor Pro on your own website and it’s easy.
As you know, for an Ecommerce store, along with other pages, the checkout page is very important and is a must. If you cannot satisfy your customers with the checkout process, they will make an instant u-turn and discourage others to come to your store site.
That is an alarming signal and the reason to go down your business goodwill at the bottom. Ignoring this part will result in bad things for your site.
To avoid this miserable situation of the website and make it a topper in the market, we are going to show you the way to create checkout page using Elementor Pro. Just keep patience and go through this article to the end to know about this.
A checkout page relates to the payment or shipping details on a WooCommerce site. It lets the customers enter payment details for the products and complete their orders. In short, it collects customers shipping details.
In another sense, a checkout page is a website page that is shown to the customers to conclude a transaction. It is equivalent to arriving at the checkout counter at any physical store, just digitally done. eCommerce websites can have either multiple or a single checkout page (s) depending upon the nature of the transaction and the product or service being offered.
Commonly, you can see the checkout page at the end of the checkout process. It gives the customer a series of payment options that shows them an overview of their shopping cart. You have to be very careful like other eCommerce shop owners and customize the checkout page based on feedback from your customers.
The checkout page also reduces your shopping cart abandonment rate. If your customers regularly abandon their carts, you have to evaluate their journey and find out the fault of your checkout page.
To keep your online store up and running, the checkout page is a must. You cannot avoid this part, because it plays a vital role to drive more visitors to your site, obviously so does the checkout design.
You have done all the settings right from the point of a user entering the checkout funnel to the finishing point. Your marketing has worked, and your website design and navigation drove them to this point, and finally, they are ready to make a transaction.
But, it is unfortunate that if your checkout design is lengthy, all your efforts will go to waste.
We found that nearly 1 out of 5 shoppers abandoned a cart in the last quarter because the checkout process was too long or complicated. So while it happens, you have to take action to avoid it, or you can at least reduce the amount of abandonment during the checkout process.
When you design an excellent and short checkout process, the user experience is as seamless as possible. If your product page helps them to add items to their basket, you have to guide them effortlessly throughout the checkout steps all the way to conversion.
It is essential that you avoid giving the user any reason to leave. So, you have to have:
All you need to optimize here is that you should set the goal to reduce the time and effort your customer takes to complete the checkout process.
Now, let’s proceed to create checkout page using Elementor for your site. To do that, you should follow these steps:
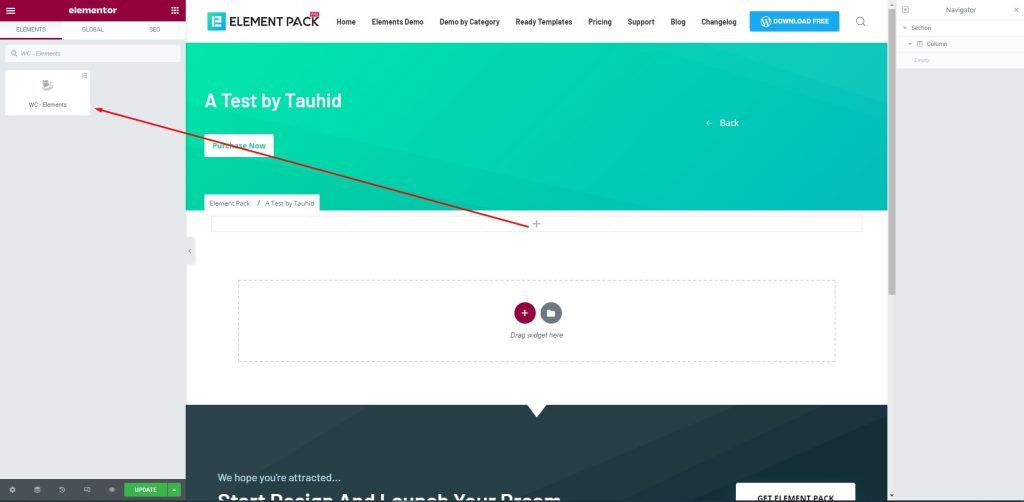
First, drag-drop the element into your page to create the checkout page.
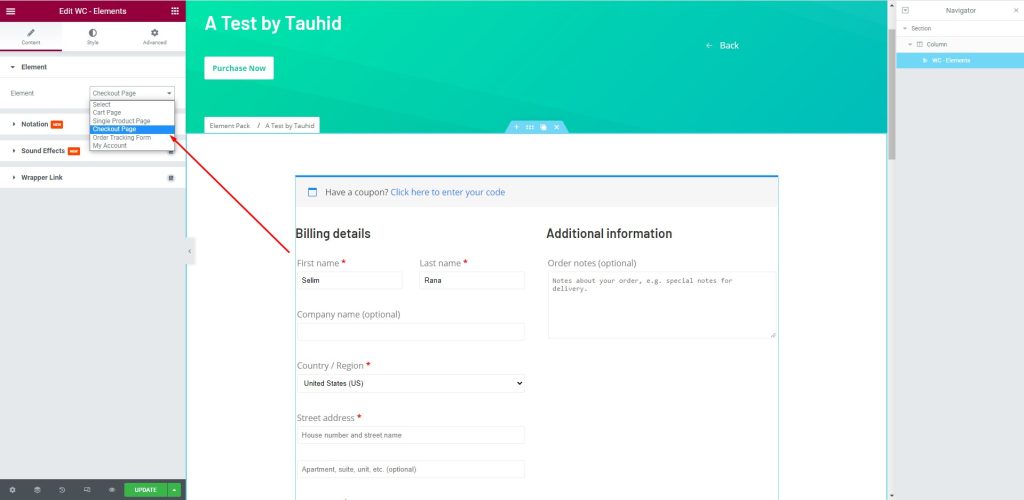
Next, go to Element > Element > Checkout Page to create a checkout page that will help you manage your customers. There are several fields to fill up with consumer information. You can provide your name and address here.
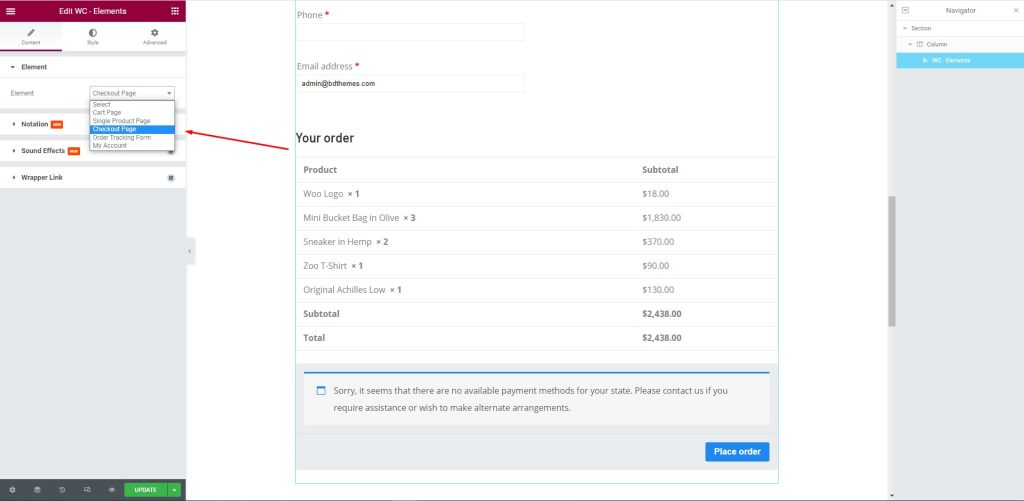
After that, edit the page for your consumers. Let them select their required items and the price against them to complete the checkout process.
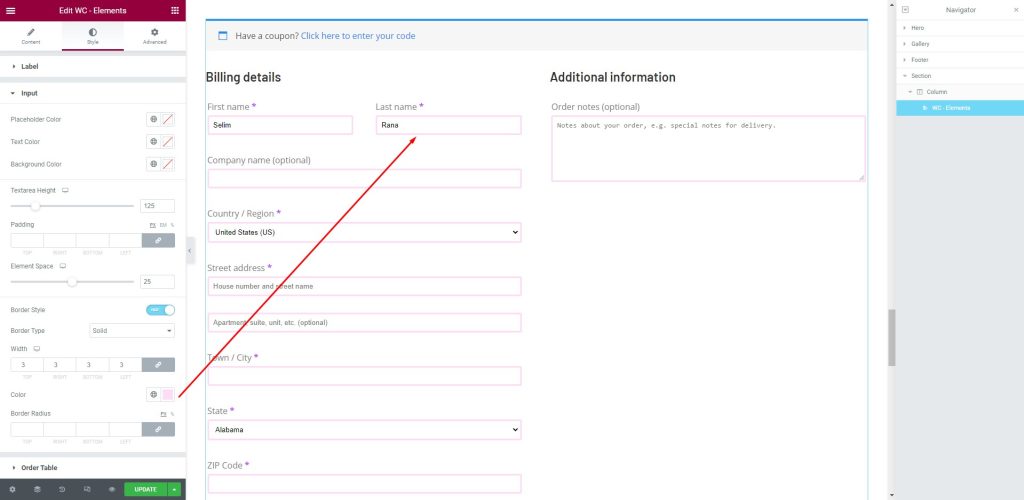
Next, go to the Style tab. Here, shoppers can provide the necessary information in the fields i.e.: First name, Last Name, Company Name, Country/ Region, Street address, Town/ City, and more.
This article is created to show you how to create a checkout page using Elementor pro. We hope that this article helps you create a checkout page. If you have any questions about checkout page or want to share your experience regarding checkout page, please don’t hesitate to leave a comment below.
Thank you for reading this article. Have a nice day.
Largest Elementor Templates pack with the most user-friendly UI and 300+ useful Elementor widgets. Build websites from zero to 100% perfection in no time.
This website is powered by Element Pack Pro and Rooten Theme.
Copyright © 2025 BdThemes. All Rights Reserved.